A leaking faucet can be a significant nuisance, especially when you’re living alone and need a quick, budget-friendly solution. The constant dripping not only wastes water but also increases your utility bills.
Fixing a leaking faucet without tools might seem challenging, but it’s a feasible DIY faucet repair task that can be accomplished with a bit of know-how.
An emergency faucet fix is necessary to prevent further damage and unnecessary expenses. In this article, we’ll guide you through the steps to fix a leaking faucet without needing specialized tools, making it an ideal solution for those on a tight budget or in a hurry.
Key Takeaways
- Identify the source of the leak to apply the correct fix.
- Turn off the water supply before starting the repair.
- Use household items as substitutes for specialized tools.
- Follow a step-by-step guide for a successful DIY repair.
- Regular maintenance can prevent future leaks.
The Real Cost of Ignoring That Dripping Faucet
The seemingly trivial drip from a faucet can lead to substantial financial and ecological impacts if left unaddressed. At first glance, a leaking faucet might appear to be a minor issue, but its effects can be far-reaching.
How Even Small Leaks Impact Your Water Bill
Even a single drip per second can waste over 3,000 gallons of water per year, significantly increasing your water bill. This not only strains your household budget but also wastes a precious resource. The financial impact might not be drastic at first, but it adds up over time. For instance, a leak that wastes 10 gallons of water per day can increase your annual water consumption by 3,650 gallons.
Environmental Impact of Household Water Waste
The environmental implications of water waste are substantial. With many regions facing drought and water scarcity, conserving water is crucial. Household water waste contributes to the depletion of freshwater resources, affecting ecosystems and wildlife. By addressing leaks promptly, households can play a significant role in household water conservation. Every gallon saved helps in maintaining the balance of our ecosystem and supports efforts to protect our planet’s natural resources.
Understanding Different Types of Faucet Leaks You Might Face
Faucet leaks can manifest in various ways, and identifying the type is crucial for effective repair. Whether you’re dealing with a kitchen sink or a bathroom faucet, understanding the source of the leak is the first step towards a successful DIY fix.
Dripping Spouts vs. Base Leaks vs. Handle Leaks
Faucet leaks typically fall into three main categories: dripping spouts, base leaks, and handle leaks. Dripping spouts are often the most noticeable, where water drips from the faucet’s outlet. Base leaks occur around the base of the faucet, indicating a problem with the seal between the faucet and the sink. Handle leaks happen when water escapes from around the handle, suggesting worn-out or damaged O-rings or gaskets.
Identifying the Source of Your Leak Without Disassembly
Identifying the source of a leak without taking the faucet apart can be challenging but is possible with the right techniques. This involves a combination of visual inspection and simple tests.
Visual Inspection Techniques
Start by turning off the water supply and drying the faucet. Then, turn the water back on and observe where the leak is coming from. Look for signs of moisture or dripping water.
Using Paper Towels to Trace Leak Origins
A practical method to identify the leak source is by using paper towels. Dry the faucet thoroughly, then wrap paper towels around different parts of the faucet. Turn on the water and observe which paper towel gets wet first, indicating the leak’s origin.
By understanding the different types of faucet leaks and using simple DIY detection methods, you can effectively identify and potentially fix the issue without needing professional help.
Your First Response: Emergency Water Shutoff Steps
The moment you notice a leak, your priority should be to minimize damage, starting with the most critical step: shutting off the water supply. This immediate action can significantly reduce the risk of water damage to your home.
Finding Your Main Water Valve When You’ve Never Looked Before
Locating the main water shutoff valve is essential, yet many homeowners are unfamiliar with its location. Typically, this valve is found near the water meter or where the water line enters your home. In many houses, it’s located in the basement, garage, or near the kitchen sink. Take a few minutes to find it before an emergency occurs. Knowing this can save you precious time when a leak happens.
To ensure you’re prepared, check your home’s layout and familiarize yourself with the plumbing system. If you’re still unsure, consider consulting a professional plumber for guidance.
Creating Quick Drip Catchers from Household Items
While waiting to shut off the water supply or fix the leak, you can minimize damage by creating DIY drip catchers using household items. This simple, effective method can protect your home from water damage.
Repurposing Food Containers
Use empty food containers or buckets to catch dripping water. Place them under the leak to collect water and prevent it from spreading. Large containers or pots can be particularly effective. Ensure they are stable and won’t tip over, causing more mess.
Strategic Towel Placement
Another quick fix is to use towels or rags to absorb the water. Place them under the leak or around the affected area to soak up as much water as possible. Old towels or cloths are perfect for this task. This method is especially useful for small, steady leaks.
Household Items That Become Your Toolbox in a Pinch
In a pinch, everyday household items can be repurposed to help you tackle that annoying faucet leak. Many common items found in your kitchen and bathroom can serve as effective substitutes for traditional plumbing tools, allowing you to make emergency repairs until you can get professional help.
Kitchen Substitutes for Traditional Plumbing Tools
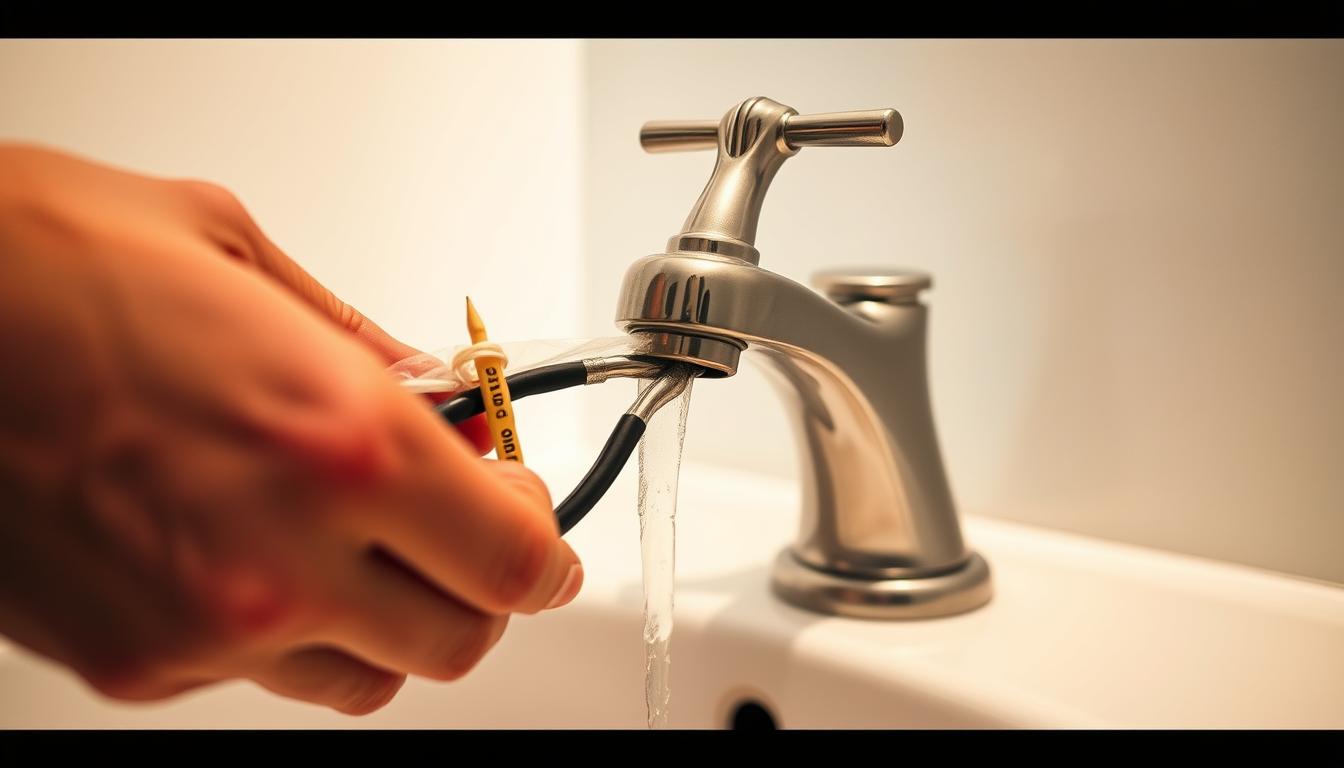
Your kitchen is likely stocked with items that can help you fix a leaking faucet. Two such items are rubber bands and zip ties, which can be used to create makeshift seals or hold things in place temporarily.
Using Rubber Bands and Zip Ties
Rubber bands can be stretched around leaky areas to create a temporary seal. Zip ties can be used to secure loose parts or hold a makeshift washer in place. While not a permanent fix, these items can help mitigate the leak until you can obtain proper tools.
How Aluminum Foil Can Save the Day
Aluminum foil is another versatile kitchen item that can be used in plumbing emergencies. It can be wrapped around corroded or leaking areas to create a temporary barrier. Simply wrap the foil around the affected area and secure it with a rubber band or zip tie if necessary.
Bathroom Products That Double as Repair Aids
Bathroom products can also be repurposed for plumbing repairs. Items like dental floss and cotton balls or Q-tips can be used in creative ways to fix leaks.
Dental Floss as Emergency String
Dental floss can be used as a makeshift string to secure loose parts or to retrieve small items that have fallen into tight spaces. Its durability and thinness make it an ideal temporary solution.
Repurposing Cotton Balls and Q-tips
Cotton balls or Q-tips can be used to clean out small areas around the faucet or to apply small amounts of sealant. They can also be used to absorb minor leaks temporarily.
By utilizing these household items, you can make temporary repairs to your leaking faucet, buying yourself time until you can implement a more permanent solution.
Fixing a Leaking Faucet Without Tools: Step-by-Step Emergency Solutions
Emergency faucet repairs don’t always require a trip to the hardware store. When you’re faced with a leaking faucet and no tools are available, there are still methods to temporarily fix the issue or mitigate the damage until professional help can be obtained.
Hand-Tightening Techniques for Loose Connections
One of the simplest ways to address a leaking faucet without tools is by hand-tightening any loose connections. This method can be effective for faucets where the leak is coming from loose joints or fittings.
Proper Grip Methods for Maximum Torque
To hand-tighten effectively, you need to ensure a good grip on the parts you’re trying to tighten. Using your fingers or the palm of your hand, apply as much torque as possible without stripping the threads. It’s essential to be gentle yet firm to avoid causing further damage.
Using Rubber Gloves for Better Grip
For parts that are particularly slippery, donning a pair of rubber gloves can provide the extra grip needed to hand-tighten loose connections. The rubber material increases friction, making it easier to turn the parts without slippage.
Creating Makeshift Washers and Seals
In cases where the leak is due to worn-out washers or seals, creating makeshift replacements can be a temporary solution. This can be particularly useful in emergency situations where replacement parts are not readily available.
Rubber Band Temporary Fixes
A simple rubber band can sometimes serve as a makeshift washer or seal. By wrapping the rubber band around the affected area, you can create a temporary barrier that stops or reduces the leak. This is not a permanent fix but can be effective in the short term.
Wax Paper and Candle Wax Applications
Another temporary solution involves using wax paper and candle wax. By shaping the wax into the required form and using wax paper to hold it in place, you can create a makeshift seal. This method is particularly useful for leaks around joints or where a more solid seal is needed.
While these methods can provide temporary relief from a leaking faucet, they are not substitutes for proper repairs. It’s crucial to address the issue permanently as soon as possible to avoid further complications.
Kitchen Faucet Emergency Repairs for Solo Dwellers
For solo dwellers, fixing a kitchen faucet leak without professional help is not only cost-effective but also empowering. Kitchen faucets, especially those with advanced features like pull-out spray hoses, can be prone to leaks. Addressing these issues promptly is crucial to prevent water waste and potential damage.
Dealing with Pull-Out Spray Hose Leaks
Pull-out spray hoses are convenient but can develop leaks over time. The most common issues arise from the hose connection or the spray head itself.
Temporary Sealing Methods
For a quick fix, you can use Teflon tape or plumber’s putty to seal the connection temporarily. These materials are easily available and can provide a short-term solution.
- Wrap Teflon tape around the threads of the connection to create a tighter seal.
- Apply plumber’s putty around the leak to temporarily stop the drip.
Connection Reinforcement Techniques
To reinforce the connection, ensure it’s hand-tightened properly. If the leak persists, consider using an adjustable wrench to tighten it further, being cautious not to overtighten.

Fixing Leaks Around the Sink Edges
Leaks around the sink edges can be due to worn-out sealants or improper installation. Addressing these leaks is crucial to prevent water from seeping under the sink.
Using Food-Safe Sealants
Apply a food-safe silicone sealant around the edges to create a watertight seal. This is a simple and effective method to stop leaks.
Pantry Items That Create Temporary Seals
In an emergency, certain pantry items can be used to create a temporary seal. For instance, a piece of chewing gum or a small piece of cloth can be used as a makeshift solution until a proper sealant is applied.
Bathroom Sink Quick Fixes When You’re on Your Own
A leaking bathroom sink is more than just an annoyance when you’re solo; it’s a challenge that requires immediate attention and a bit of creativity to fix without calling a plumber.
Dealing with bathroom sink issues on your own can be daunting, but there are several quick fixes you can apply to get your sink back in working order. The key is to identify the source of the leak and apply the appropriate fix.
Pop-Up Drain Leaks: Easy Solutions
Pop-up drain leaks are a common issue in many bathroom sinks. These leaks often occur due to worn-out gaskets or loose connections.
Makeshift Gaskets from Common Materials
One way to fix a leaking pop-up drain is by creating a makeshift gasket using common household materials. For instance, you can use a piece of cloth or a rubber band to create a seal. Simply wrap the material around the connection point and secure it tightly.
Reinforcing Loose Connections
If the leak is due to a loose connection, you can reinforce it by tightening the fittings. Use a wrench or pliers to tighten any loose parts. If you don’t have these tools, you can try using a cloth or rubber to create extra grip.
Dealing with Corroded Fixtures Without Replacement
Corroded fixtures can also cause leaks in your bathroom sink. While replacement is often the recommended solution, there are temporary fixes you can apply.
Cleaning Methods Using Household Products
You can clean corroded fixtures using household products like vinegar or baking soda. Soak the corroded area in vinegar or apply a paste made from baking soda and water. Let it sit for a while before rinsing.
Creating Protective Barriers with Common Items
To prevent further corrosion, you can create a protective barrier using common items. For example, applying a layer of wax or silicone sealant around the corroded area can protect it from further damage.
By applying these quick fixes, you can temporarily resolve the issue with your bathroom sink until you can get a more permanent solution.
When the Leak is Under the Sink: Cabinet Space Solutions
A leaking faucet or pipe under the sink is more than just a nuisance; it’s a call to action for a quick and effective solution. When faced with under sink leaks, it’s crucial to identify the source of the leak and address it promptly.
Identifying Supply Line vs. Drain Leaks
The first step in fixing a leak under the sink is determining whether it’s coming from the supply lines or the drain. Supply line leaks often occur at the connection points to the faucet or toilet. Check these areas for signs of moisture or water droplets. On the other hand, drain leaks typically happen at the connections between the sink drain and the P-trap or further down the drain line. Inspecting these areas carefully can help you pinpoint the leak’s source.
Hand-Tightening Connection Points
Once you’ve identified the leak’s source, hand-tightening connections can often resolve the issue. This is particularly effective for leaks around the supply lines and P-trap connections.
Proper Technique for P-Trap Connections
To hand-tighten P-trap connections, start by ensuring the connections are free from debris. Then, tighten the slip nuts by hand until they’re snug. Be careful not to overtighten, as this can damage the threads or crush the gasket.
Supply Line Hand-Tightening Methods
For supply lines, check the connections to the faucet and the shut-off valves. Hand-tighten these connections, taking care not to strip the threads. If a leak persists, consider using a makeshift washer or seal to enhance the connection’s integrity.
By following these steps, you can effectively address under sink leaks without needing specialized tools, ensuring your kitchen or bathroom remains functional and leak-free.
Budget-Friendly Materials to Keep on Hand for Future Emergencies
Emergency plumbing situations can be stressful, but being prepared doesn’t have to break the bank. Having the right materials on hand can significantly reduce the stress and cost associated with fixing a leaking faucet or other plumbing emergencies.
Creating a $15 Emergency Plumbing Kit
Assembling an emergency plumbing kit doesn’t have to be expensive. For under $15, you can gather essential items that will help you tackle common plumbing issues. Some must-haves include:
- Teflon tape
- Adjustable wrench
- Pipe wrench
- Plumber’s putty
- Duct tape
These tools can help you address leaks, tighten loose connections, and make temporary repairs until a professional can assist you.
Dollar Store Finds That Work as Well as Expensive Solutions
You don’t need to spend a fortune on plumbing supplies. Many dollar store items can serve as effective alternatives to more expensive solutions. For instance:
Effective Adhesives and Tapes
Duct tape and epoxy can be lifesavers in a plumbing emergency. They can help seal leaks temporarily or bond broken parts together.
Multi-Purpose Repair Items Worth Stocking
Items like rubber bands, wire, and silicone sealants can be repurposed for various plumbing fixes. For example, a rubber band can sometimes be used to temporarily fix a leaky hose.

By stocking up on these budget-friendly materials, you’ll be better equipped to handle plumbing emergencies without breaking the bank.
Temporary vs. Permanent: Understanding the Limits of Tool-Free Fixes
Emergency plumbing fixes can be effective in the short term, but it’s essential to understand their limitations. When you fix a leaking faucet without tools, you’re implementing a temporary solution that can help you manage until you can get a proper, permanent fix.
How Long Your Emergency Fix Will Last
The longevity of an emergency fix depends on several factors, including the nature of the leak, the materials used for the fix, and the water pressure in your pipes. Generally, a well-implemented temporary fix can last anywhere from a few days to a few weeks.
For instance, using a makeshift washer or seal can temporarily stop a drip. However, the durability of such a fix varies based on the material used and the faucet’s usage rate.
Signs Your Temporary Fix is Failing
It’s crucial to monitor your temporary fix for signs of failure. Two key areas to watch are water pressure warning signs and visual indicators of deterioration.
Water Pressure Warning Signs
An increase in water pressure can strain your temporary fix, leading to its failure. Signs include:
- Increased leakage
- Spray or splashing from the faucet when turned on
- Noises from the faucet or pipes
Visual Indicators of Deterioration
Visual signs that your temporary fix is failing include:
- Visible cracks or splits in the makeshift materials
- Discoloration or mineral buildup around the fix
- Warping or deformation of the temporary seal or washer
Regularly checking for these signs can help you determine when your temporary fix is nearing its end, allowing you to plan for a more permanent solution.
| Fix Type | Average Longevity | Common Failure Signs |
|---|---|---|
| Makeshift Washer | 1-3 weeks | Increased leakage, material degradation |
| Temporary Seal | 2-4 weeks | Cracks, discoloration, warping |
| Hand-Tightened Connections | Until next use | Leakage, loosening of connections |
When to Admit Defeat: Recognizing When Professional Help is Needed
There’s a fine line between a simple fix and a complex plumbing problem that requires expert intervention. While DIY solutions can be cost-effective and empowering, there are times when the issue at hand is beyond your control or expertise.
Warning Signs of Serious Plumbing Issues
Some leaks are more than just a nuisance; they’re indicators of serious underlying problems. If you notice any of the following signs, it’s time to consider seeking professional help: persistent leaks despite your best efforts to fix them, water damage or warping around the faucet area, or a significant increase in your water bill without an apparent cause.
These signs suggest that the issue might be more complex, potentially involving corroded pipes, faulty faucet design, or other problems that require specialized tools and expertise.
Finding Affordable Emergency Plumbers in Your Area
When you decide to seek professional help, the next step is to find a reliable and affordable plumber. Start by asking for referrals from friends, family, or neighbors who have faced similar issues. You can also check online reviews and ratings to narrow down your options.
Using Service Apps for Quick Quotes
In today’s digital age, several service apps can connect you with local professionals, including plumbers. These apps often provide quick quotes and allow you to compare prices and services. Some popular options include TaskRabbit, Thumbtack, and Angi.
Negotiating Rates When You’re in a Bind
When you’re facing an emergency, it’s natural to feel pressured into accepting the first quote you receive. However, it’s worth taking a moment to compare prices and negotiate if possible. Some plumbers may offer discounts for first-time customers or during off-peak hours.
By being informed and prepared, you can find an affordable solution to your plumbing woes without compromising on quality.
Dealing with Landlords: Getting Repairs Done When You Don’t Own the Property
If you’re a tenant dealing with a leaky faucet, understanding your rights and responsibilities is crucial. As a renter, you’re not responsible for the property’s maintenance, but you are expected to report any issues promptly to your landlord or property manager.
Documenting the Problem Effectively
To ensure a swift resolution, it’s essential to document the plumbing issue thoroughly. Take clear, dated photos or videos of the leak and any resulting damage. Keep a record of all correspondence with your landlord, including emails, letters, and notes from phone calls. This documentation will be invaluable if there’s a dispute about the issue or the repairs.
Understanding Your Rights as a Tenant
As a tenant, you have the right to a safe and habitable living environment. This includes having plumbing issues addressed in a timely manner. Familiarize yourself with your local tenant laws, which typically outline the responsibilities of both landlords and tenants regarding maintenance and repairs.
Legal Timeframes for Repairs
Most jurisdictions specify a timeframe within which landlords must address reported issues. This can range from a few days to a few weeks, depending on the severity of the issue and local regulations. Understand these timeframes to know when to follow up with your landlord.
When You Can Deduct Repair Costs from Rent
In some cases, if a landlord fails to address a maintenance issue within the required timeframe, tenants may be entitled to deduct the cost of repairs from their rent. However, this should be done in accordance with local laws and after proper documentation. It’s often advisable to seek legal advice before taking this step.
Preventing Future Leaks: Simple Maintenance Anyone Can Do
Maintaining a leak-free faucet is easier than you think, and it all starts with simple, regular checks. By incorporating a few easy habits into your routine, you can significantly reduce the likelihood of faucet leaks and the associated water waste.
Monthly Checks That Take Just 5 Minutes
Performing monthly checks on your faucet can help identify potential issues before they become major problems. To do this, start by turning off the water supply lines under the sink. Then, inspect the faucet’s aerator for mineral buildup and clean it if necessary. Check the faucet’s handle and base for any signs of moisture or dripping. These simple steps can help prevent leaks from forming. Additionally, consider running hot and cold water through the faucet to check for any irregularities in water pressure or flow.
Seasonal Maintenance to Prevent Common Problems
Different seasons bring different challenges for your faucet. Understanding these seasonal variations can help you prepare and prevent common problems.
Winter Preparation Steps
During the winter months, it’s essential to protect your faucet from freezing temperatures. Insulate exposed pipes in unheated areas like the garage or basement. Disconnect and drain hoses from outdoor faucets to prevent freezing and bursting. Consider letting cold water drip from the faucet served by exposed pipes to help prevent freezing.
Summer Humidity Considerations
In the summer, high humidity can lead to condensation on your faucet, potentially causing water damage or promoting mold growth. Regularly wipe down the faucet to prevent water spots and mineral deposits. Ensure good ventilation in your kitchen and bathroom to reduce humidity levels.
Upgrading to Leak-Resistant Fixtures on a Budget
Upgrading to leak-resistant fixtures is a smart move for solo dwellers looking to save on water bills and avoid plumbing emergencies. This upgrade not only conserves water but also reduces the likelihood of dealing with frustrating leaks and potential water damage. When considering an upgrade, it’s essential to focus on both the quality and affordability of the fixtures.
What Features Matter Most for Reliability
When selecting leak-resistant fixtures, several features stand out for their impact on reliability. Durable materials, such as brass or stainless steel, are preferable over plastic due to their longevity and resistance to corrosion. Cartridge quality is another crucial factor, as it directly affects the faucet’s ability to shut off completely and prevent drips. Additionally, fixtures with ceramic discs are known for their durability and resistance to wear and tear.
| Feature | Benefit | Material/Technology |
|---|---|---|
| Durability | Long-lasting | Brass, Stainless Steel |
| Leak Resistance | Water Conservation | Ceramic Discs |
| Easy Maintenance | Simplified Repair | Cartridge Quality |
Best Budget-Friendly Brands for Solo Dwellers
For those on a budget, several brands offer quality leak-resistant fixtures without breaking the bank. Moen and Delta are well-regarded for their affordable and reliable fixtures. When shopping, look for entry-level models that still offer the desired features.
Entry-Level Options with Quality Construction
Brands like Moen offer entry-level faucets with features like cartridge technology that enhance durability. These models are designed to be both affordable and reliable, making them ideal for solo dwellers.
Where to Find Discounted Quality Fixtures
Discounted quality fixtures can be found at home improvement stores like Home Depot or Lowe’s, which often have sales on reputable brands. Online retailers like Amazon also offer competitive pricing and customer reviews to help with the selection process.
Conclusion: Becoming Self-Sufficient in Home Maintenance
Mastering the art of self-sufficient home maintenance can be a game-changer for homeowners, especially when it comes to handling unexpected plumbing issues. By learning DIY plumbing repairs, individuals can save money, reduce stress, and become more confident in their ability to manage their homes.
Embracing self-sufficient home maintenance means being proactive and prepared. It involves understanding the basics of plumbing repairs, having the right materials on hand, and knowing when to seek professional help. By adopting this mindset, homeowners can tackle common issues like leaking faucets without relying on expensive services.
DIY plumbing repairs are an essential skill for anyone looking to become more self-sufficient in home maintenance. By learning simple fixes and having a basic understanding of plumbing systems, individuals can address problems before they become major issues. This not only saves money but also helps to prevent water waste and reduce the risk of more extensive damage.
By taking control of home maintenance, homeowners can enjoy greater peace of mind and a sense of accomplishment. Whether it’s fixing a leaky faucet or performing routine checks, self-sufficient home maintenance empowers individuals to be more hands-on and proactive in caring for their homes.